Printers are cheap but they are still expensive enough to make some repairs worthwhile. There is a surprising number of parts in them, and every part is a potential failure point. The most common failure is a clogged print head. They are notoriously difficult to clean because of their microscopic nozzles. The first attempt should be to use the self-cleaning command, found in the printer properties dialog. If that fails, the print head will need to be removed and wiped with alcohol. Both the contacts and nozzles should be cleaned well, and avoid touching them after cleaning. If all that fails, consider replacing the print head.
Inkjet Printer Repair
One benefit of the cheaper models is having the print head on the cartridge, so buying a new cartridge usually fixes the problem. For others, buying a new print head can be expensive, and its usually better to buy a new printer.
Another failure point is the power cord. Turn off the power first, then check the cord for any obvious cuts or sharp bends. A cord that is twisted enough times can break internally without showing any signs of damage. Use the continuity checker on a multimeter to check for internal breaks. A battery and light globe can also be used for this test. Also check the sockets for bent or broken pins.
Check the power supply unit for any sign of smoke or melted plastic. This indicates that it has overheated and potentially failed. Fixing a power supply unit is best left to professionals. However, the cost is not worth it, and just like the print head, its usually better to buy a new printer.
Inkjet printers have a small sponge that soaks up excess ink from the print head. Eventually, the sponge fills up with ink, and this causes smudging due to the buildup of excess ink. The sponge can be can be replaced with some cotton wool but its a messy and difficult job.
Paper jams are a sign of trouble with the rollers that pickup and feed the paper through the printer. Over time, the roller rubber becomes hard and smooth. This can cause the paper to slip and jam. Rubbing them gently with a cottonbud soaked in alcohol, or even with fine sandpaper, may help them grip better.
Squeaking is caused by a lack of lubrication in the roller bearings. This can be fixed with some mineral oil, but getting it into the right spot is difficult. If too much oil is applied, it will find its way onto the rollers and smear the paper.
Unless the problem is simple to fix, its usually better to buy a new inkjet printer. Only the more expensive models justify the high cost of servicing and parts.
Senin, 17 Februari 2014
Senin, 02 Desember 2013
HP Laserjet 5si service mode
1 Hold down [Items] and [+] while powering ON the printer, until all lights are illuminated and the Display is blank. (If the Display Panel reads INTERNAL TEST at this point, the keys were released too soon. Repeat this step until successful.)
2 Press [Select]. The message SERVICE MODE is displayed briefly, then the printer automatically begins an INTERNAL TEST. After several seconds, both Control Panel Indicators turn OFF. (The printer may display WARMING UP if it has not warmed up completely.) After the printer has warmed up and passed the self test, SERVICE MODE is displayed.
3. Press [Menus] once to display SERVICE MENU.
4. Once it says SERVICE MENU press ITEM to scroll through service mode items.
To exit the Service Mode press [On Line].
Minggu, 01 Desember 2013
How to reset the ink cartridge Canon PG 37 black
 If the black cartridge refills PG-37 where are you going to put on the printer you put a sign saying that the cartridge is empty or is not correct cartridge.
Esto no es por que no tenga tinta (ojo que tambien puede estar vacio) es que la impresora pixma no tienen un sensor para saber la cantidad de tinta que tiene, lo que hace es reconocer el cartucho que se te termino y avisarte que esta vacio al contar determinada cantidad de impresiones.
This is not because you do not have ink (note that also can be empty) is that the printer pixma not have a sensor to determine the amount of ink you have, what it does is recognize the cartridge that is over and warn you that this vacuum to have certain amount of impressions.
Para solucionar esto lo que hay que hacer es: To fix this you have to do is:
Cuando intentes imprimir y te sale el cartel de que no tiene tinta apreta durante 20 segundo el boton (depende el modelo de impresora cual boton, pude ser el de las hojas o uno que tiene dibujado un triangulo al reves) When you try to print and sign out the ink has not click the button for 20 seconds (depending on the printer model that button, I could be the leaves or one that has drawn a triangle upside down)
Cuando lo sueltes se borrara el nivel de tinta y podras imprimir tranquilamente. Be erased when you release the ink and you can print smoothly. Lo que de ahora en adelante no te va a decir nunca mas que cantidad de tinta tiene. What henceforth not going to say anymore that has ink. PERO PUEDES IMPRIMIR ! BUT YOU CAN PRINT!
Sabtu, 30 November 2013
RESETTER PRINTER TUTORIAL T20 Epson Stylus PHOTO
Before using the Software Resetter Epson Stylus T20, make sure:
a. Epson Stylus T20 Printer Driver is installed first, and make sure the printer is connect to the computer
b. Make sure you have the "Software Resetter Printer Epson Stylus T20"
c. Make sure that the damages requested in the printer reset counter (usually a red flame of the lamp on the printer all)
Here is a tutorial resetter Epson Stylus T20:
1. Set Adjustment Epson Stylus T20 software on your computer
2. If the software is compressed, the software used to extract his resetter Epson T20
3. Printer Switch
4. Open the folder resetter Epson Stylus T20 Adjprog.exe you and run the file.
5. Click Accept
6. Click Particular adjustment mode menu entry to reset the printer counter
7. Find and click on Waste ink pad counter menu, then click OK
8. Click Check to find out the counter value at the time of blinking, and Ok to continue
Click initialization to change / reset the printer counter becomes zero, so the printer to be normal again. Then click OK to continue
9. Click Finish to end the process of resetting the counter Epson Stylus T20
10. Click Previous to return to main menu
11. Click Quit to exit the program counter reset Epson Stylus T20
12. Reset waste ink counter Epson Stylus T20 is done, turn off the printer for a while, then restart the printer, and wait until the printer calibration is completed
Jumat, 29 November 2013
Reset Counter Epson Stylus C80
There two way to Set tabulator Epson Tool C80, are : Adjust Drill and using drtool software
Exercise adjust
* Bespeak trailing both the publisher and ink buttons piece you play on the knowledge.
* When the press out LED is virtuous flashing pass both buttons and press and include the inkcleaning fix for at least 10 seconds.
* The printer present round finished and ego bill for nigh 3 transactions and then serve unremarkably.
Using DRTool
* Run DRTool software
* Set printer imitate to C80
* Emit reset covering counter
Kamis, 28 November 2013
How to Resetting the maintenance count LaserJet 9000mfp 9000Lmfp
1. Turn the printer off.
2. Press and hold the 6 button, then press the power button to turn the MFP on.
3. When the three LEDs are on, release the 6 button.
4. "SELECT LANGUAGE" appears on the screen. Press and release the 3 button. "NEW MAINTENANCE KIT" appears on the screen.
5. Press and release the 6 button again.
2. Press and hold the 6 button, then press the power button to turn the MFP on.
3. When the three LEDs are on, release the 6 button.
4. "SELECT LANGUAGE" appears on the screen. Press and release the 3 button. "NEW MAINTENANCE KIT" appears on the screen.
5. Press and release the 6 button again.
Rabu, 27 November 2013
Reset Ink Level on Canon Pixma iP1800 Canon Pixma iP1880 using iPtool software
I get this tutorial from fixyourownprinter.com forum to solve the ink level error in canon Pixma iP1800/Canon Pixma iP1880. This problem usually appear after refilled the cartridge on the canon printer and ink level indicator showing the ink cartridge is empty although you have filled a cc Ink into the cartridge. And if the problem occur you cannot using your printer to print. The solution you must reset ink level on the printer if you want your computer work again.
If you have a problem like that you ca follow this tutorial to solve your printer problem, here how:
If you have a problem like that you ca follow this tutorial to solve your printer problem, here how:
- Turn of the printer and Disconnect the power cable to the printer.
- Press power button on the printer. While pressing the button connect the power cable to the power source (the power indicator will light in green)
- While still holding power button press resume button twice – orange blink and return to green.
- Release the power button, then the PC will recognize new cartridge installed (If the power indicator on the printer steady in green you continue to Steps 5)
- Run the IPtools software, please await after this software detect your printer correctly or you can set the printer model on “Change Model” section.
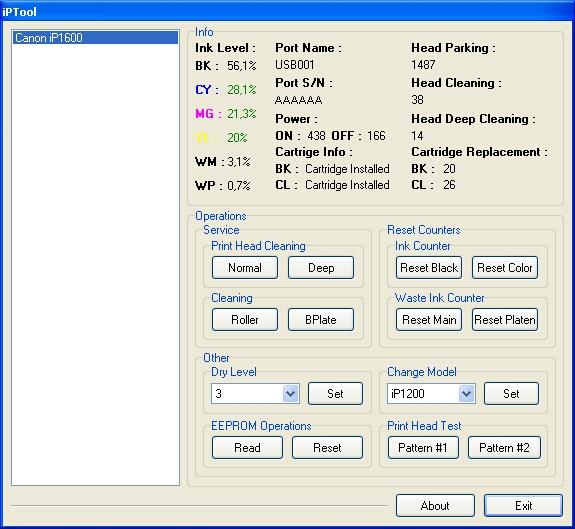
- Click “reset black and reset color” button to reset the ink level and Click “reset main and reset platen” to reset waste ink counter. After clicked the button you will see ink level of the cartridge on in the IPTol info has 100% and WP and WM has set to 0. Click Exit on IPTool
- Turn off the printer and turn on again.
Langganan:
Postingan (Atom)